Are you a proud owner of a Roomba robot vacuum? If so, you’re already enjoying the convenience of hands-free cleaning. These little machines are designed to navigate and clean your floors with minimal input from you, making your life easier and your home cleaner. However, to ensure your Roomba continues to perform at its best, it’s essential to pay attention to its components. Before we start, here’s the list of Roomba components for our understanding on roomba operations.
A Roomba robot vacuum is composed of several essential components that work together to provide effective and autonomous cleaning. Here is a list of the key components of a typical Roomba:
- Roomba Components:
- The Importance of Clean Roomba Sensors
- Step-by-Step Guide to Clean Your Roomba Sensors
- Cleaning Brushes
- Clean Roomba Brush Cage
- Optical Sensors for Precise Cleaning
- Infrared Sensors for Obstacle Detection
- Cliff Sensors for Safety
- Dirt Detection Sensors for Efficient Cleaning
- Cleaning of Roomba Bag
- Conclusion
- Frequently Asked Questions:
Roomba Components:
- 1. Main Body: This is the central unit of the Roomba that houses the robot’s core components, including the battery, motor, and control systems.
- 2. Control Panel: On some models, there is a control panel or interface on the main body that allows users to initiate cleaning, set schedules, and access various settings.
- 3. Sensors:
• Cliff Sensors: These sensors detect cliffs, stairs, and drop-offs to prevent the Roomba from falling.
• Optical Sensors: Optical sensors are responsible for detecting obstacles, dirtier areas, and adjusting cleaning patterns.
• Infrared Sensors: Infrared sensors help with obstacle detection and navigation around objects.
• Dirt Detection Sensors: Some models feature dirt detection sensors that identify particularly dirty spots for targeted cleaning. - 4. Wheels:
• Main Wheels: These provide movement and maneuverability to the Roomba.
• Caster Wheels: Caster wheels offer stability and aid in changing direction and navigation around obstacles. - 5. Brushes:
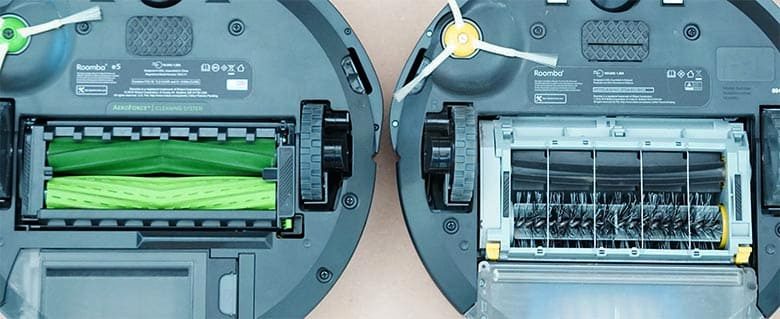
• Main Brush Roll: The main brush roll agitates and sweeps debris into the vacuum’s path.
• Side Brushes: Side brushes help sweep dirt and debris from corners and edges, guiding it towards the main brush. - 6. Dustbin: The dustbin is where collected dirt, dust, and debris are stored during cleaning. It’s an essential component for the Roomba’s cleaning process.
- 7. Filter: A filter helps trap fine particles and allergens, improving air quality in your home.
- 8. Battery: The rechargeable battery provides power to the Roomba for cleaning sessions. Lithium-ion batteries are commonly used for longer runtimes.
- 9. Charging Contacts: These are metal contacts on the Roomba and charging base that allow the robot to dock for recharging.
- 10. Charging Base: The charging base is where the Roomba returns to recharge between cleaning sessions.
- 11. Brush Roll Cage: The brush roll cage holds the brushes and plays a role in dirt agitation and collection.
- 12. Navigation Technology: Some Roomba models incorporate advanced navigation technology, such as vSLAM (Visual Simultaneous Localization and Mapping), to map and navigate your home efficiently.
- 13. Clean/Power Button: A button on the Roomba or its remote control that initiates cleaning sessions.
- 14. Virtual Wall Barriers: These optional devices create virtual barriers to restrict the Roomba’s access to certain areas of your home.
- 15. HEPA Filter (on some models): A high-efficiency particulate air (HEPA) filter helps capture even smaller particles and allergens, improving air quality.
- 16. WiFi Connectivity (on some models): Some Roomba models are equipped with WiFi connectivity, allowing users to control the robot via smartphone apps and voice assistants.
- 17. App Control (on some models): A smartphone app provides additional control, scheduling, and monitoring features for select Roomba models.
- 18. Dirt Disposal Base (on some models): Certain high-end models come with a self-emptying dirt disposal base that automatically empties the Roomba’s dustbin into a larger container.
These components work in harmony to make the Roomba a versatile and efficient robot vacuum cleaner, capable of navigating your home, detecting dirt and obstacles, and delivering thorough cleaning. The specific components and features may vary depending on the Roomba model you own or choose to purchase.
The Importance of Clean Roomba Sensors
Clean Roomba sensors are a critical aspect of your robot’s functionality. They help it detect obstacles, navigate around furniture, and avoid falling down stairs. Keeping these sensors clean and well-maintained is the key to ensuring your Roomba provides consistent, efficient cleaning.
Your Roomba employs a range of sensors, details of which are mentioned below along with their cleaning tips.
Step-by-Step Guide to Clean Your Roomba Sensors
Now that you understand the significance of clean Roomba sensors, let’s dive into the step-by-step process to keep them in top condition.
Gather Your Tools
Before we start, let’s make sure you have all the necessary tools on hand:

To effectively clean and maintain your Roomba, you’ll need a set of tools, some of which are essential for thorough cleaning, and others are optional, depending on your preferences and the specific model of your Roomba. Here’s a comprehensive list of both essential and optional tools:
Essential Tools:
- – Phillips Screwdriver: A must-have tool for removing bolts to access various components like the side brush, brush roll assembly, and base plate.
- – Microfiber Towel: Ideal for removing dust and debris accumulation on various components, such as the brush roll, brush cage, and sensors.
- – Scissors: Essential for owners of older Roomba models with bristle brush rolls, as they help in cutting and removing hair from the brushes.
- – Brush (optional): A paintbrush or any flat brush is useful for dislodging dirt inside the dustbin or bin sensor and filter.
- – Cotton Buds (optional): Handy for cleaning delicate components, such as the drop sensors, with precision.
- – Face Mask (optional): Recommended for individuals with allergies to avoid inhaling dust and allergens during cleaning.
- – Gloves (optional): Optional for those who prefer not to get their hands dirty during the cleaning process.
- – Handheld Vacuum (optional): While not necessary, a handheld vacuum with a brush attachment can save time when cleaning the dustbin and filter.
Optional Tools for Advanced Cleaning:
- – Mini-Phillips Screwdriver: If your Roomba model has specific components that require a smaller screwdriver, this tool can be useful.
- – Virtual Wall Barriers: These devices create virtual barriers to restrict the Roomba’s access to certain areas, providing more control over where the robot cleans.
- – Additional Filters: Having spare filters on hand can be convenient, allowing you to replace them as needed to maintain optimal cleaning performance.
- – Extra Brushes: If your Roomba has replaceable brushes, keeping extras can extend the life of your robot vacuum and ensure consistent cleaning quality.
- – HEPA Filters: HEPA filters are beneficial for trapping finer particles and allergens, particularly if you or someone in your household has allergies or respiratory sensitivities.
- – Dirt Disposal Bags (if applicable): For Roomba models with a self-emptying base, having additional dirt disposal bags ensures uninterrupted operation.
These tools will help you effectively clean and maintain your Roomba, ensuring that it continues to operate efficiently and deliver excellent cleaning performance. The optional tools are useful for those who want to take their maintenance routine to the next level or require specialized accessories for their specific Roomba model.
Now that we have our tools ready, let’s begin cleaning.
Cleaning Brushes
Cleaning the brushes on your Roomba is a crucial part of routine maintenance to ensure optimal cleaning performance. This guide will walk you through the steps to clean both the primary brush and the side brushes on your Roomba. Here’s how to do it:
Tools Needed:
- Philips screwdriver
- Microfiber towel
- Scissors (for older models with bristle brushes)
- Optional: Brush, cotton buds, gloves, handheld vacuum
Step-by-Step Guide:
1. Prepare Your Roomba:
- Before you start, turn off and unplug your Roomba to ensure safety during the cleaning process.
2. Access the Primary Brush:
- For most Roomba models, you’ll need to access the primary brush by removing the brush cage. Use a Philips screwdriver to remove any screws holding the brush cage in place. Once the brush cage is accessible, you can proceed to remove the primary brush.
3. Remove the Primary Brush:
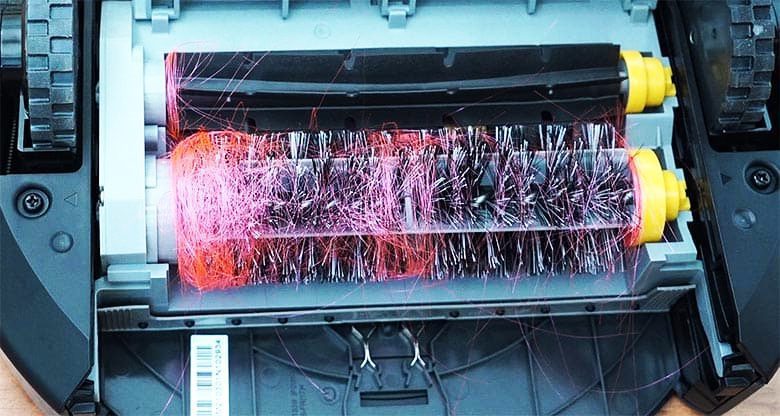
- Carefully lift the primary brush out of its housing. Inspect the brush for any tangled hair, dirt, or debris. If you have an older Roomba model with bristle brushes, use scissors to cut and remove any hair wrapped around the brush or its axles.
4. Clean the Primary Brush:
- Wipe the primary brush with a microfiber towel to remove dust and debris accumulation. Ensure that you remove any hair from the axles to prevent unnecessary friction and wear.
5. Cleaning Side Brushes:
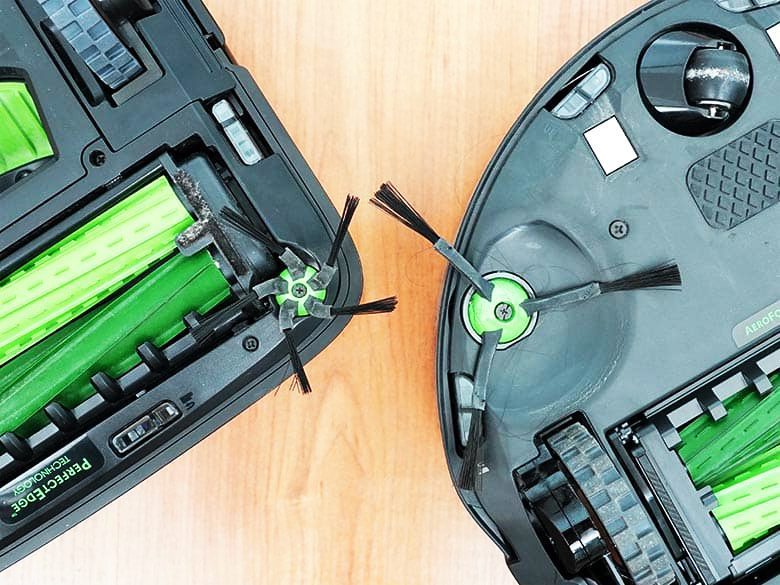
- All Roomba side brushes have a three-pronged design with bristled tips. To clean the side brush, start by loosening the single bolt holding it in place using a Philips screwdriver.
6. Detach the Side Brush:
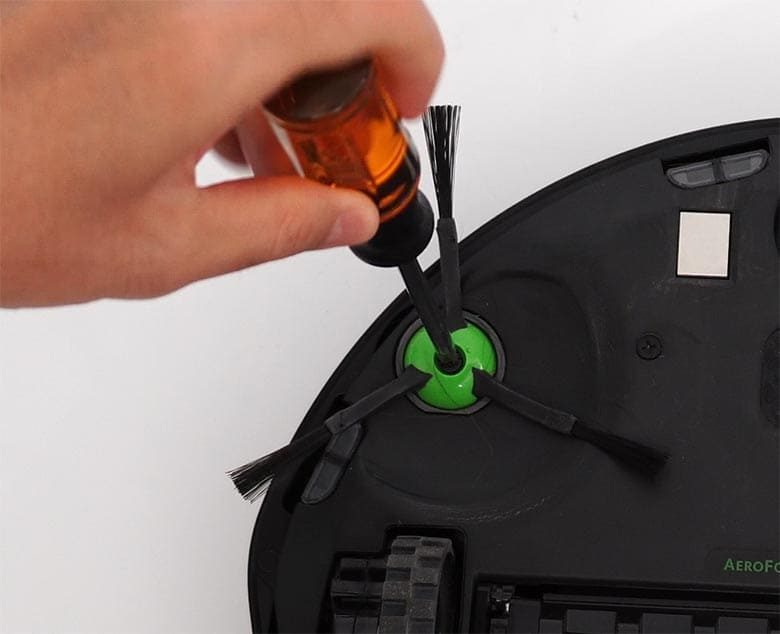
- Once you’ve removed the bolt, detach the side brush from its base. Check for any hair accumulation, as it can cause premature wear on the side brush motor.
7. Clean the Side Brush:
- Wipe the side brush with a microfiber towel to remove any dust buildup. Make sure it’s free from dirt and debris before reattaching it to the robot.
8. Reassemble:
- After cleaning both the primary and side brushes, reattach them to your Roomba following the reverse order of removal. Make sure to tighten any bolts securely.
9. Optional Cleaning:
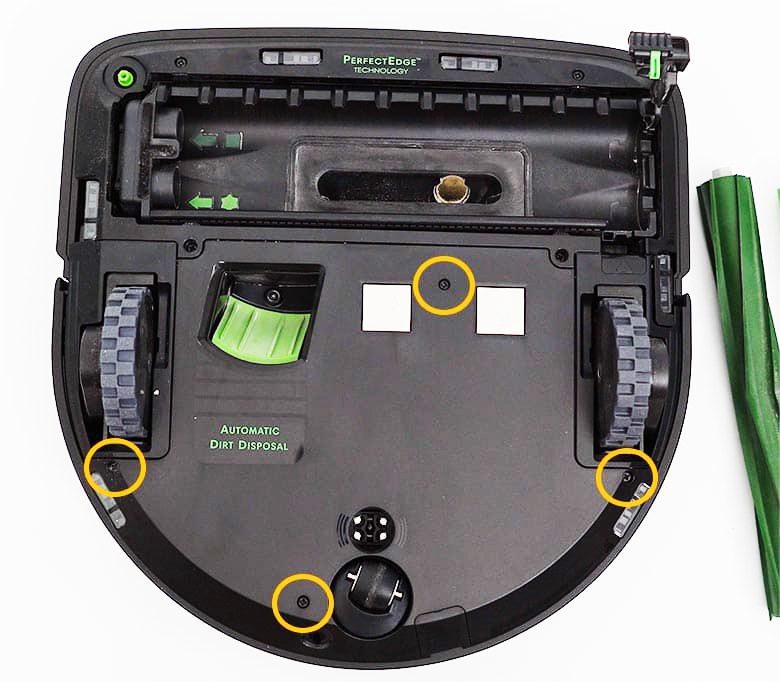
- If you want to take your cleaning further, you can clean the inner components underneath the brush cage. To access these components, you may need to remove the base plate using a Philips screwdriver. Be cautious not to loosen the screws all the way, just enough to remove the cover.
- Once the base plate is removed, you can access the bolts holding the brush cage. Loosen these bolts, lift the brush assembly, and clean it with a microfiber towel. The process for cleaning these inner components is similar for many Roomba models with round frames.
Following these steps will help you maintain your Roomba’s primary and side brushes, ensuring that they continue to perform effectively and extend the lifespan of your robot vacuum. Remember to perform these cleaning tasks regularly to keep your Roomba in top shape.
Clean Roomba Brush Cage
Cleaning the brush cage, also known as the brush roll assembly, is an important part of Roomba maintenance, as it helps ensure efficient cleaning and prolong the life of your robot vacuum. This guide will walk you through the steps to clean the brush cage effectively:

Tools Needed:
- Philips screwdriver
- Microfiber towel
- Optional: Mini-Philips screwdriver
Step-by-Step Guide:
1. Prepare Your Roomba:
- Turn off and unplug your Roomba to ensure safety during the cleaning process.
2. Access the Brush Cage:
- To access the brush cage, you’ll need to remove the base plate. Use a Philips screwdriver to loosen the screws that secure the base plate to your Roomba. It’s essential to note that you don’t need to remove the screws entirely; just loosen them enough to remove the cover.
3. Lift the Base Plate:
- Gently lift the base plate, revealing the brush cage assembly underneath. Most Roomba models have a round frame, so the process is similar for various models.
4. Remove the Brush Roll:
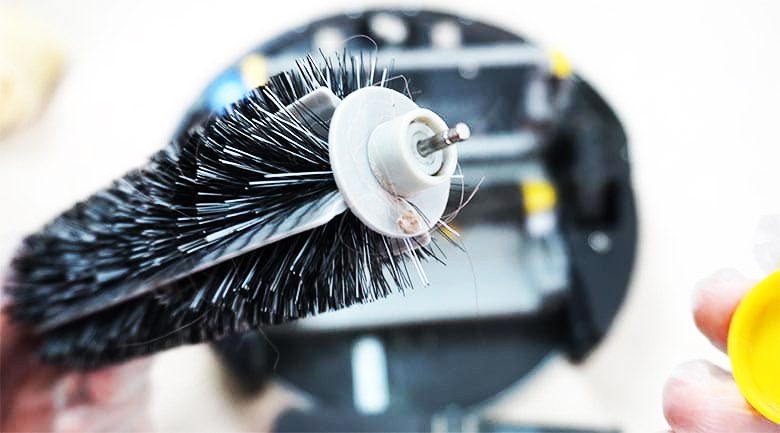
- Once you have the base plate off, you can easily remove the brush roll assembly. It’s held in place by bolts that are accessible once the base plate is removed. Use a mini-Philips screwdriver if necessary to remove these bolts.
5. Check for Debris:
- Inspect the brush roll for any dirt, hair, or debris that may have accumulated on it. Make sure to check the axles as well, as debris can accumulate there and affect the brush’s performance.
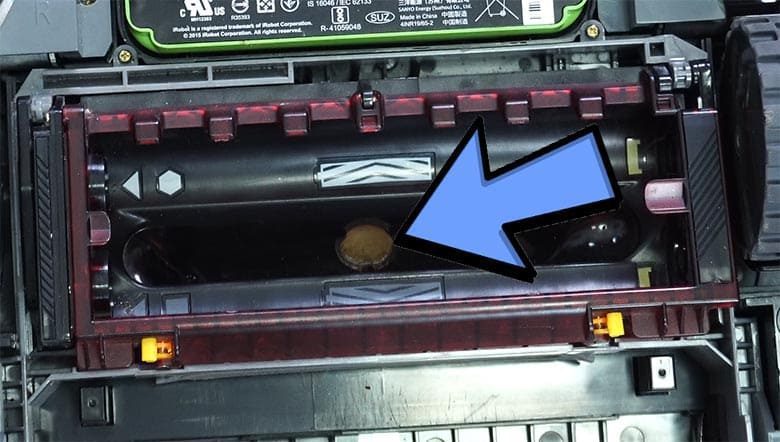
6. Clean the Brush Roll:
- Use a microfiber towel to wipe down the brush roll and remove any dirt or debris. Pay attention to the “dirt detect” sensor, which is often located in this area. Cleaning the sensor ensures that it functions correctly.
7. Optional Inner Cleaning:
- If you want to take your cleaning further, you can clean the inner components of the brush cage. Use a handheld vacuum with a brush attachment or a clean microfiber towel to remove any accumulation, especially on the “dirt detect” sensor. This step is particularly important for maintaining the sensor’s accuracy.
8. Reassemble the Brush Cage:
- Once you’ve cleaned the brush roll and any inner components, reattach the brush roll assembly to your Roomba. Make sure to tighten the bolts securely.
9. Replace the Base Plate:
- Carefully place the base plate back in its original position, ensuring that it lines up correctly with the screw holes.
10. Secure the Base Plate:
- Use your Philips screwdriver to tighten the screws on the base plate securely. Ensure that the base plate is securely fastened to prevent any issues during operation.
By following these steps, you can effectively clean the brush cage of your Roomba, ensuring that it continues to perform at its best. Regular maintenance of the brush roll and associated components helps maintain your Roomba’s cleaning efficiency and prolong its service life.
Optical Sensors for Precise Cleaning
Optical sensors are an integral component of your Roomba that play a crucial role in ensuring precise and efficient cleaning. These sensors are responsible for detecting dirt, recognizing dirtier areas, and adjusting the cleaning patterns of your robot vacuum accordingly. They are the “eyes” of your Roomba, allowing it to navigate your home effectively and provide a thorough cleaning experience.
Here’s a detailed breakdown of optical sensors, their function, and how to clean and maintain them:
Function of Optical Sensors
Optical sensors are primarily designed to identify areas with higher concentrations of dirt, debris, or dust. They do this by emitting a beam of light and analyzing the reflection. When the sensor detects a significant difference in the reflection of light, it identifies that area as dirtier than the surroundings. This information is then used by your Roomba to adjust its cleaning pattern.
Here’s how optical sensors enhance the cleaning process:
- – Spot Cleaning: When your Roomba detects a dirtier area, it concentrates its cleaning efforts in that specific spot, making sure to remove the dirt and dust thoroughly.
- – Enhanced Navigation: Optical sensors help your Roomba navigate around obstacles, furniture, and other objects more effectively. By identifying these objects and assessing their location, the robot can adjust its path to avoid collisions.
- – Efficient Cleaning: Your Roomba can optimize its cleaning pattern by identifying dirtier areas. This ensures that it spends more time cleaning where it’s needed the most, leading to a more thorough clean.
Cleaning Optical Sensors
Over time, optical sensors can accumulate dirt, smudges, or dust, which can hinder their effectiveness. Cleaning these sensors is a straightforward process that ensures your Roomba continues to provide precise cleaning. Here’s how to clean optical sensors:
- – Power Off Your Roomba: Before you begin, make sure your Roomba is turned off to prevent any accidents during cleaning.
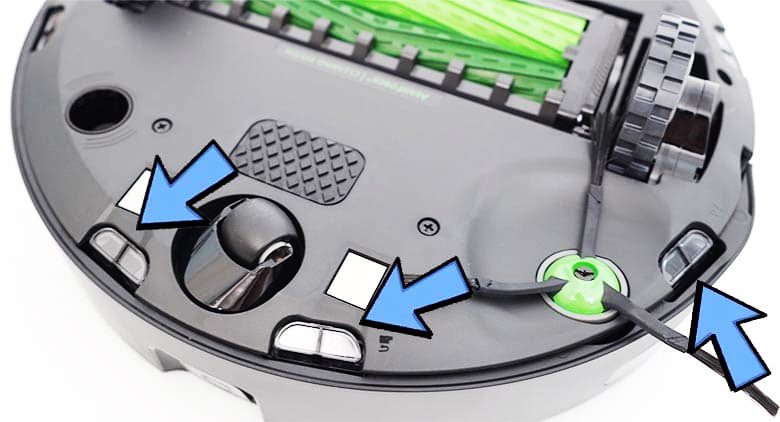
- – Locate the Optical Sensors: The optical sensors are typically situated on the underside of your Roomba. Look for small, clear or red-tinted windows.
- – Use a Microfiber Cloth: Take a clean, dry microfiber cloth and gently wipe the optical sensors. Ensure that you don’t apply excessive force, as this can lead to damage.
- – Check for Residue: Inspect the sensors for any remaining dirt or smudges. If necessary, dampen the cloth slightly and wipe again to ensure they are entirely clean.
- – Reassemble and Test: Once the sensors are clean, reassemble your Roomba, turn it on, and test it to make sure it responds correctly to dirtier areas. You can also observe how it navigates around obstacles to ensure that it is functioning optimally.
Maintenance Tips
To keep your optical sensors in the best working condition, consider the following maintenance tips:
- Regularly check the underside of your Roomba for accumulated dirt, debris, or tangled hair. Clean any obstructions that might be blocking the sensors or interfering with their functionality.
- Periodically inspect the cleanliness of the microfiber cloth you use for cleaning. Ensure it is free from any residues that could be transferred to the sensors.
- If you notice persistent issues with the optical sensors, consider contacting Roomba customer support or referring to your Roomba‘s user manual for specific troubleshooting and maintenance guidance.
By understanding the function of optical sensors and following these cleaning and maintenance steps, you can ensure that your Roomba continues to provide precise and effective cleaning throughout your home.
Learn more about “Roomba clean sensors replacement” for additional information on sensor maintenance and troubleshooting.
Infrared Sensors for Obstacle Detection
Infrared sensors are a vital component of your Roomba robot vacuum, responsible for detecting obstacles and ensuring your device navigates safely and efficiently. These sensors act as the “eyes” of your Roomba, enabling it to identify objects in its path, avoid collisions, and deliver effective cleaning. Here, we’ll delve into the functions of infrared sensors, their significance in obstacle detection, and how to maintain them for optimal performance.
Function of Infrared Sensors
Infrared sensors serve a critical role in helping your Roomba navigate and clean your home. These sensors emit infrared light beams and detect their reflections to identify obstacles and changes in the environment. The primary functions of infrared sensors in your Roomba are as follows:
- Obstacle Detection: Infrared sensors are designed to detect objects in the robot’s path, such as furniture, walls, and other obstacles. By emitting infrared beams and analyzing their reflections, your Roomba can determine the presence and proximity of objects, preventing collisions.
- Collision Avoidance: When an obstacle is detected, your Roomba adjusts its cleaning path to avoid colliding with the object. This adaptive navigation ensures that the device effectively cleans around obstacles without causing damage to itself or your furniture.
- Stair and Ledge Detection: Infrared sensors also play a crucial role in detecting staircases or ledges. By recognizing the drop-offs, your Roomba ensures it does not tumble down stairs or ledges, preventing potential damage and ensuring its safety.
Cleaning Infrared Sensors
To maintain the effectiveness of your Roomba‘s infrared sensors, regular cleaning is necessary. Over time, these sensors can accumulate dirt, dust, or smudges, potentially hindering their ability to detect obstacles and navigate effectively. Here’s a step-by-step guide on how to clean and maintain your Roomba‘s infrared sensors:
- Turn Off Your Roomba: Always ensure your Roomba is powered off before performing any cleaning or maintenance tasks to prevent accidents.
- Identify the Infrared Sensors: The infrared sensors are typically located on the front and sides of your Roomba. Look for small, round or oval-shaped components with a transparent or reddish appearance.
- Use a Microfiber Cloth or Cotton Bud: Gently wipe the infrared sensors with a clean, dry microfiber cloth or a cotton bud. The goal is to remove any dirt, smudges, or dust that may have accumulated on the sensor’s surface.
- Check for Obstructions: Inspect the sensors for any physical obstructions that could hinder their operation. If you find any foreign objects, carefully remove them to ensure the sensors function optimally.
- Reassemble and Test: Once you’ve cleaned the infrared sensors, reassemble your Roomba, turn it on, and observe its navigation. Ensure that it successfully avoids obstacles and does not exhibit any erratic behavior.
Maintenance Tips
To keep your infrared sensors in excellent working condition and ensure they perform their obstacle detection functions reliably, consider the following maintenance tips:
- Regularly check the areas around the sensors for accumulated dirt, debris, or tangled hair. Cleaning these areas will help maintain unobstructed sensor performance.
- Inspect the cleanliness of the microfiber cloth or cotton bud you use for cleaning. Make sure they are free from residues or contaminants that could affect the sensors.
- If you encounter persistent issues with your Roomba‘s infrared sensors or need further guidance, refer to your Roomba user manual or contact Roomba customer support for specific troubleshooting and maintenance instructions.
By understanding the functions of infrared sensors and following the cleaning and maintenance steps outlined here, you can ensure that your Roomba continues to navigate your home safely and efficiently, providing effective cleaning while avoiding collisions and damage.
Cliff Sensors for Safety
Cliff sensors are a vital safety feature in your Roomba robot vacuum, designed to prevent accidental falls, collisions, and ensure safe navigation. These sensors play a crucial role in safeguarding your device and home by detecting cliffs, staircases, or ledges and allowing your Roomba to change its course to avoid them. In this comprehensive guide, we will delve into the functions of cliff sensors, their significance in ensuring your Roomba operates safely, and how to maintain them for optimal performance.
Function of Cliff Sensors
Cliff sensors are engineered to protect your Roomba from potential hazards in your home. Their primary function is to detect abrupt changes in surface elevation, such as staircases, ledges, or other drop-offs. Here’s how they contribute to your Roomba‘s safety and the safety of your home:
- Detecting Stairs and Ledges: Cliff sensors use infrared or other optical technologies to identify changes in surface elevation. When your Roomba approaches stairs or ledges, the sensors recognize the drop-off and send a signal to the robot’s navigation system.
- Collision Avoidance: Upon detecting a potential fall, your Roomba adjusts its course to avoid the cliff or ledge. This ensures that the robot vacuum does not tumble down stairs or ledges, preventing damage to both your device and your home.
- Safe Cleaning: Cliff sensors enable your Roomba to navigate your home with confidence, avoiding dangerous areas and ensuring that it completes its cleaning tasks without accidents or disruptions.
Cleaning Cliff Sensors
Regular cleaning and maintenance of your Roomba‘s cliff sensors are essential to ensure their proper functioning and to keep your robot vacuum safe during operation. Here’s a step-by-step guide on how to clean and maintain cliff sensors:
- Turn Off Your Roomba: Always switch off your Roomba to ensure safety during cleaning and maintenance.
- Locate the Cliff Sensors: Cliff sensors are typically located on the front and sides of your Roomba. These sensors often appear as small, circular or oval components.
- Use a Clean Microfiber Cloth: Gently wipe the cliff sensors with a clean, dry microfiber cloth. This will help remove any dust, dirt, or smudges that may have collected on the sensor’s surface.
- Check for Obstructions: Inspect the sensor areas for any physical obstructions, such as debris or tangled hair. If you find any, carefully remove these obstructions to ensure the sensors function correctly.
- Reassemble and Test: After cleaning, reassemble your Roomba, turn it on, and observe its navigation. Ensure that the device successfully avoids cliffs and ledges and maintains safe cleaning patterns.
Maintenance Tips
To ensure the continued safety of your Roomba and your home, consider the following maintenance tips for cliff sensors:
- Regularly inspect the areas surrounding the sensors for accumulated dirt, debris, or obstructions. Keeping these areas clean will help ensure uninterrupted sensor operation.
- Check the cleanliness of the microfiber cloth you use for cleaning. Make sure it is free from any residues that could affect the sensors’ performance.
- If you encounter persistent issues with your Roomba‘s cliff sensors or require additional guidance, consult your Roomba user manual or reach out to Roomba customer support for specific troubleshooting and maintenance instructions.
By understanding the functions of cliff sensors and following the cleaning and maintenance steps provided here, you can ensure that your Roomba navigates your home safely and efficiently, avoiding falls and potential hazards while providing effective cleaning.
Dirt Detection Sensors for Efficient Cleaning
Dirt detection sensors are a valuable feature in many Roomba robot vacuums, contributing to more efficient and thorough cleaning. These sensors are designed to identify areas of your home that require extra attention, ensuring that your Roomba concentrates its cleaning efforts where they are needed the most. Here’s a brief overview of how dirt detection sensors work and their role in enhancing the cleaning process:
How Dirt Detection Sensors Work:
Dirt detection sensors are typically optical sensors or acoustic sensors that scan the area in front of the Roomba during its cleaning cycle. They work by analyzing the reflectivity of surfaces, looking for differences in the amount of light or sound waves that bounce back. When the sensors detect a higher concentration of dirt, dust, or debris on a particular section of the floor, they trigger the Roomba to take specific actions.
The Role of Dirt Detection Sensors:
- Spot Cleaning: When dirt detection sensors identify a particularly dirty spot, the Roomba switches to spot cleaning mode. In this mode, it performs intensive cleaning in a small area, making multiple passes to ensure that the concentrated dirt or debris is thoroughly removed.
- Effective Cleaning: Dirt detection sensors contribute to a more effective cleaning process by directing the Roomba to spend extra time in areas where dirt is most prevalent. This targeted approach ensures that even heavily soiled areas receive the attention they need.
- Optimized Cleaning Patterns: By utilizing the data from dirt detection sensors, the Roomba can adjust its cleaning patterns and movement. It may slow down or make additional passes over areas that require more cleaning, contributing to a more comprehensive clean.
- Improved Air Quality: Concentrating on areas with higher dirt levels not only enhances the appearance of your floors but also improves indoor air quality. By removing more dirt and allergens, the Roomba helps create a healthier living environment.
- Time and Energy Savings: Dirt detection sensors help the Roomba work more efficiently by prioritizing the areas that need the most attention. This results in time and energy savings as the robot vacuum doesn’t waste resources on already clean sections of the floor.
Dirt detection sensors are a valuable tool for ensuring that your Roomba provides thorough and efficient cleaning. They help the robot vacuum adapt to the specific cleaning needs of your home, delivering a more personalized and effective cleaning experience. As a result, you can enjoy cleaner floors and improved air quality with minimal effort on your part.
Cleaning of Roomba Bag
Cleaning the bag in your Roomba, if applicable to your model, is an essential part of maintenance to ensure efficient performance. The bag helps collect dirt and debris during cleaning, and regular cleaning of the bag prevents clogs and ensures your Roomba operates optimally. Here’s a guide on how to clean the bag:
Tools Needed:
- Face mask (if you have allergies)
- Clean microfiber towel
Step-by-Step Guide:
1. Prepare Your Roomba:
- Turn off and unplug your Roomba to ensure safety during the cleaning process.
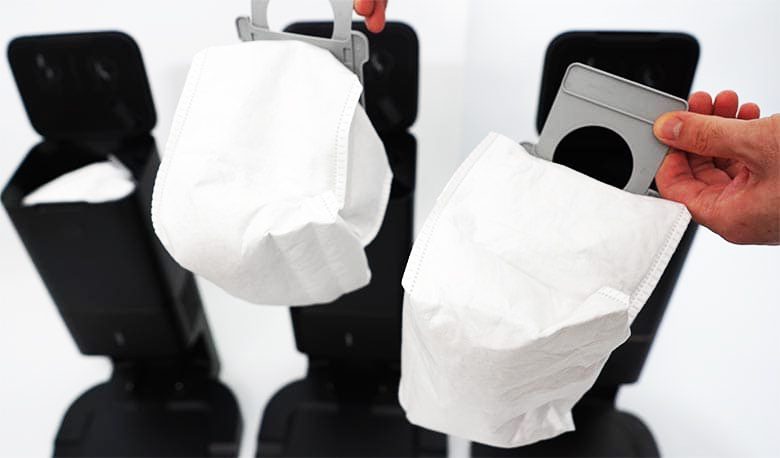
2. Locate the Bag:
- Depending on your Roomba model, the bag may be located inside the dustbin or as a separate component. If it’s inside the dustbin, you’ll need to open the dustbin to access the bag.
3. Empty the Bag:
- If your Roomba has a disposable bag, carefully empty its contents into a trash container. Be sure to do this in an area where it’s easy to clean up any accidental spills.
4. Shake and Squeeze:
- To ensure you’ve removed as much debris as possible, shake the bag to dislodge any stuck dirt. Squeeze the bag to push out any remaining dirt, and continue until you’ve removed the majority of debris.
5. Wipe the Bag:
- Use a clean microfiber towel to wipe the inside of the bag. Make sure to remove any remaining dirt, dust, or residue. It’s essential to clean the bag thoroughly to prevent any clogs or blockages in your Roomba‘s airflow.
6. Replace the Bag (if applicable):
- If your Roomba uses disposable bags, replace the bag with a new one. Ensure it’s securely in place, following the manufacturer’s instructions for your specific model.
7. Dispose of Dirt Responsibly:
- Dispose of the dirt you’ve collected from the bag responsibly, according to your local waste disposal guidelines. Some areas may have specific regulations for disposing of vacuum cleaner waste, so it’s essential to check local rules.
8. Reassemble Your Roomba:
- If you had to disassemble any parts of your Roomba to access the bag, ensure everything is put back together correctly. This includes closing the dustbin or any other components you may have opened.
Cleaning the bag in your Roomba ensures that it continues to function efficiently, preventing clogs and maintaining optimal airflow. Regular bag cleaning is a crucial part of maintaining your robot vacuum’s performance and prolonging its lifespan.
Conclusion
Cleaning your Roomba sensors is a straightforward yet essential task to ensure your robot vacuum operates at peak performance. By following our step-by-step guide, you can keep your Roomba in excellent condition, delivering consistent and efficient cleaning results.
So, whether you have a busy household, pets, or simply value a clean home, your Roomba is your trusted cleaning companion. Maintain those sensors, and your Roomba will always have your back.
Visit the official Roomba website to explore the latest models and find the perfect Roomba for your home.
Frequently Asked Questions:
How many sensors do Roombas have?
Roombas are equipped with various sensors that allow them to navigate and clean effectively. These sensors typically include cliff sensors to detect drop-offs, infrared sensors for obstacle detection, optical sensors for advanced navigation (in some models), and dirt detection sensors to identify areas that need more thorough cleaning.
Does Roomba use cameras?
Some Roomba models come equipped with a top-mounted camera or front-facing camera, which aids in navigation and mapping. These cameras are used to provide visual data that helps the Roomba navigate and avoid obstacles, as well as create maps of your home for more efficient cleaning.
Is Roomba an AI?
While Roomba uses advanced technologies to navigate and clean, it’s not considered a full-fledged AI (artificial intelligence) system. Instead, it relies on a combination of sensors, algorithms, and machine learning to adapt to its environment and perform its cleaning tasks effectively.
Can I use Roomba without the Internet?
Yes, you can use Roomba without an internet connection. Roombas are designed to function autonomously, and many of their features, such as basic navigation and cleaning, do not require an internet connection. However, an internet connection may be required for certain advanced features, like remote control via a smartphone app or integration with smart home platforms.
Does Roomba work without light?
Yes, Roombas can work without direct light. Roombas rely on sensors and cameras (if equipped) to navigate and clean, so they do not require specific lighting conditions to function. They are designed to work in a variety of indoor lighting environments, including both well-lit and dimly lit areas.