Are you searching for the ideal bidet for a toilet without a tank? We understand that finding the perfect bidet can be challenging. To assist you in making the best choice, we’ve compiled this comprehensive guide, which also delves into the bidet for toilet without tank price, explores options available on Amazon, and identifies the best bidet for a tankless toilet. Additionally, we’ll share insights from Reddit users on their bidet experiences, discuss bidet attachments for tankless toilets, and evaluate the remarkable benefits of a bidet toilet. Let’s get started!
What’s a Bidet for a Toilet Without a Tank?
Before we explore the various facets of bidets designed for toilets without tanks, let’s clarify what they are and why they’re gaining popularity.
Bidet for Toilet Without Tank – An Overview
A bidet for a toilet without a tank, often referred to as a tankless bidet, is a modern bathroom fixture designed to enhance personal hygiene and comfort. Unlike traditional bidets that are standalone fixtures, these innovative bidets can be attached to your existing toilet. They are available in two primary forms: bidet seats and bidet attachments, each offering unique features and benefits.
Why Opt for a Tankless Bidet?
In recent years, tankless bidets have garnered substantial attention for several compelling reasons. Here’s a brief overview of the advantages that might persuade you to consider one:
- Endless Warm Water: With tankless bidets, warm water is provided on-demand, ensuring that you never run out of warmth during your wash. Say goodbye to unexpected cold splashes!
- Sleek and Space-Saving Design: These bidets boast a slim and contemporary design, adding a touch of modernity to your bathroom without consuming much space.
- Energy Efficiency: Tankless bidets only heat water when you use them, minimizing energy consumption and making them environmentally friendly.
- User-Friendly Installation: Most tankless bidets are engineered for straightforward DIY installation, making them accessible to everyone.
Now that we’ve established why a tankless bidet might be the perfect choice for you, let’s proceed to the installation process.
Installing Your Bidet Seat or Attachment
Step 1: Pre-Installation Checks
Before starting on the installation process, there are a few essential factors to consider:
– Toilet Compatibility
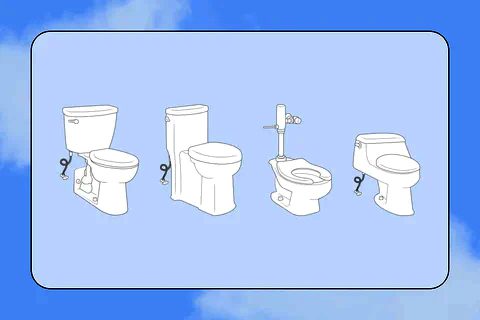
It’s vital to confirm that your toilet is compatible with a bidet attachment or seat. Ensure that your toilet type and bowl shape match the requirements. Reputable bidet brands typically provide compatibility lists to simplify the selection process.
– Electrical Access

If you’re contemplating an electric bidet seat, ensure that your bathroom has access to an electrical outlet. For safety purposes, we recommend using a Ground Fault Circuit Interrupter (GFCI) outlet, which can cut off electricity in case of a short circuit.
Step 2: Gathering Your Tools and Materials
To complete the installation, you’ll need specific tools and materials. Here’s a detailed list of what you’ll require:
Tools (not included with your bidet):
- – Screwdrivers (flathead or Phillips-head, depending on your toilet seat screws).
- – Towels for knee padding and cleaning up any spills.
- – A bowl to catch any residual water from the hose line.
Materials (usually included with your bidet):
- – Bidet Seat or Attachment.
- – Mounting Base Plate, Brackets, and Bolts.
- – Rubber Inserts.
- – Tank Adapter.
- – Flexible Hose Line.
- – Batteries (if your bidet is remote control operated).
- – Power Cord (if your bidet is electric).
Step 3: Turning Off the Water
Before commencing the installation, turn off the water supply to your toilet by shutting off the water supply valve located at the base of the toilet tank. Afterward, flush the toilet to drain the bowl as much as possible. Don’t fret if there’s still a small amount of residual water; it’s entirely normal.
Step 4: Removing the Toilet Seat
With the water supply off, it’s time to remove your toilet seat. You may need to flip open the screw caps to access the mounting hardware. Unscrew the mounting bolts and set them aside.
While your toilet seat is removed, take advantage of this opportunity to give your toilet a thorough cleaning, reaching all those challenging-to-reach areas that are usually hidden.
Step 5: Installing a Bidet Toilet Seat
– Connecting the Hose Line
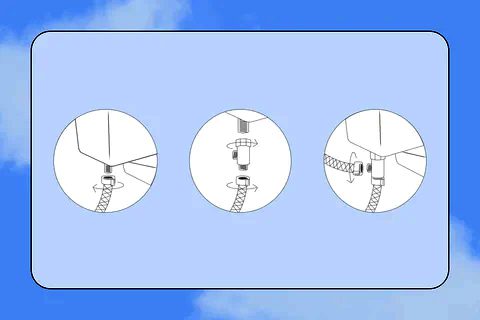
Once the toilet seat is out of the way, disconnect the existing flexible hose from your toilet tank. Turn it clockwise (as you look at the hose from above), and be prepared to catch or wipe up any residual water that might spill onto the floor. Don’t be alarmed; it’s only clean water.
In your bidet seat kit, you’ll find a tank adapter. Screw the existing hose you just removed to the bottom of this adapter. Then, screw the top of the adapter onto your toilet tank. Be cautious not to cross-thread or overtighten; hand-tightening should suffice.
Next, screw the flexible hose included with your bidet to the side connection of the tank adapter. Again, be careful not to overtighten.
Note: Always connect your bidet to the cold water line, not the hot water line. If you don’t have access to the tank connection, you can use a valve adapter for installation at the shutoff valve on the wall or at the sink.
– Attaching the Bidet to the Bowl

Your toilet likely has two exposed bolt holes at the back of the bowl. These are where you should insert the rubber inserts that came with your bidet seat. Ensure that the inserts are almost flush with the toilet rim.
Place the base plate that came with your bidet seat over these bolt holes, ensuring it’s centered and straight. If the base plate has a rubber or non-stick side, ensure that it faces down.
Align the back of the base plate with the toilet tank, leaving a gap of at least 3/4″ or about the thickness of your thumb.
Now, align your bidet seat with the base plate you’ve mounted. It should slide into place and may even click when it’s properly aligned.
– Connecting and Checking for Leaks
Now that your bidet seat is in place, you can connect the open end of the flexible hose, which is attached to the tank adapter, to the inlet port of your bidet. Be cautious not to cross-thread or overtighten; hand-tightening is sufficient.
Turn on your water shutoff valve and examine all connection points to ensure there are no visible leaks. If you notice the hose only turns once before stopping, it might be cross-threaded and not sealed correctly. In this case, unscrew the hose and reattach it until the threads align properly. You can use thread tape for a perfect, leak-free fit if necessary.
Pro Tip: Do not activate the spray until you’re seated to prevent water from spouting across your bathroom unexpectedly.
Step 6: Enjoy Your Bidet
Once all connections are leak-free and the area is dry, plug your bidet seat into a GFCI (ground fault circuit interrupter) outlet. If the outlet is out of reach, consider using a 3-prong grounded extension cord or a grounding converter for 2-prong outlets. The latter should only be a temporary solution until a properly grounded outlet can be installed by a qualified electrician.
With everything set up, take a seat and explore all the features your bidet seat offers. Familiarize yourself with the remote control, warm seat, and the bum dryer. But remember, don’t activate the spray until you’re comfortably seated, or you might have an adventurous bathroom moment reminiscent of “Free Willy.”
Start Using Your Bidet!
Now that you’ve installed your bidet seat, you’re ready to enjoy the cleanest and most comfortable bathroom experience of your life. However, be cautious when you start using it. Turn the pressure knob slowly to begin because household water pressures can vary significantly. We don’t want any unexpected surprises during your first bidet experience!
And remember, bidets aren’t just for cleaning; they offer multiple benefits, including improved personal hygiene, reduced toilet paper usage, and increased comfort.
Conclusion
In this comprehensive guide, we’ve explored the wonderful world of bidets for toilets without tanks. These innovative fixtures are designed to make your bathroom experience more comfortable and hygienic. They offer endless warm water, save space, and are eco-friendly.
Installing a bidet seat or attachment is a manageable DIY project that you can complete with a few basic tools and materials. By following the step-by-step instructions provided in this guide, you can confidently install your bidet and start enjoying its many benefits.
So, why wait? Upgrade your bathroom experience with a bidet for your toilet without a tank and discover the joys of modern hygiene and comfort.
Ready to take the plunge into the cleanest booty of your life? Shop TUSHY’s easy-to-install bidet collections or check out our Bidet Buying Guide to learn more!
Frequently Asked Question:
Can you install a bidet on any toilet?
Modern bidet seats and bidet attachments are designed to fit most standard two-piece toilets, which include a bowl, a tank, and a flexible steel hose connection between the water supply and the tank. You’ll know you have this type of toilet if all the water supply connections are visible.
Do you need special plumbing for a bidet?
No, you don’t need to plumb new lines to accommodate a bidet attachment. Everything you need is already in your walls and in your bidet kit. The only exception might be if your toilet uses a rigid pipe water connection rather than a flexible hose connection, which you can easily address with a quick trip to your local hardware store.