Creating an Organized WordPress Website Navigation with WordPress Submenus is key to improving user experience and making it easier for visitors to find the content they’re looking for. One way to achieve this is by using submenus. Submenus not only help you categorize and structure your content but also make your site navigation more intuitive for your visitors. In this comprehensive guide, we’ll walk you through the process of how to create submenus in WordPress, step by step. Additionally, we’ll explore examples of how to create submenus in WordPress, ensuring that you have a clear understanding of the concept. By the end of this article, you’ll have the skills to enhance your website’s organization and user experience.
- Understanding Submenus in WordPress
- Step 1: Log in to Your WordPress Dashboard
- Step 2: Access the Menu Settings
- Step 3: Create a New Menu
- Step 4: Add Menu Items
- Step 5: Create Submenus
- Step 6: Customize Menu Items
- Step 7: Save Your Menu
- Step 8: Assign the Menu to Your Site
- Step 9: Test Your Submenus
- Step 10: Further Customization (Optional)
- Exploring Examples of How to Create Submenus in WordPress
- Wrapping Up
- FAQ's:
Understanding Submenus in WordPress
Before we dive into the how-to, let’s briefly understand what submenus are in the context of WordPress. Submenus are a type of navigation element that appears beneath a parent menu item. They are used to group related pages or content, making it easier for users to find what they’re looking for on your website.
Why Submenus Matter
Imagine you have a website with various categories such as “Blogs,” “Tutorials,” and “About Us.” Under each of these main categories, you may have several subcategories or specific pages. Without submenus, your menu bar could become cluttered, overwhelming visitors and making navigation confusing. Submenus solve this problem by organizing your content into a structured and logical hierarchy.
Now that we’ve established the importance of submenus, let’s jump into the steps to create them in WordPress.
Step 1: Log in to Your WordPress Dashboard
To begin, log in to your WordPress dashboard. You’ll need administrator or editor privileges to create and edit menus.
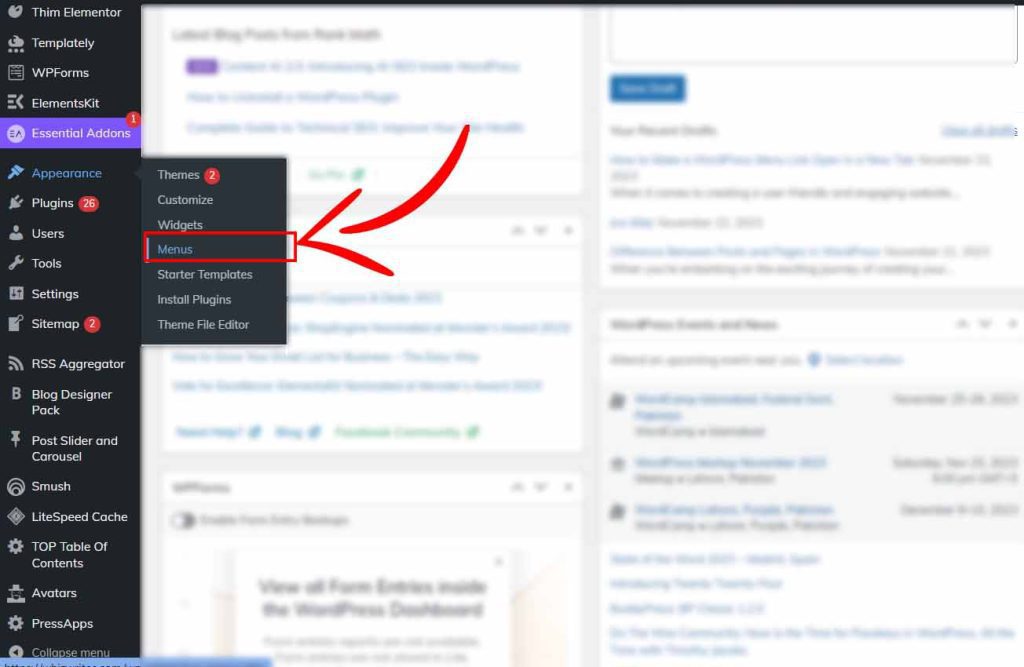
Step 2: Access the Menu Settings
Once you’re logged in, look for the “Appearance” option in the left-hand sidebar. Hover over it, and a submenu will appear. Click on “Menus.”
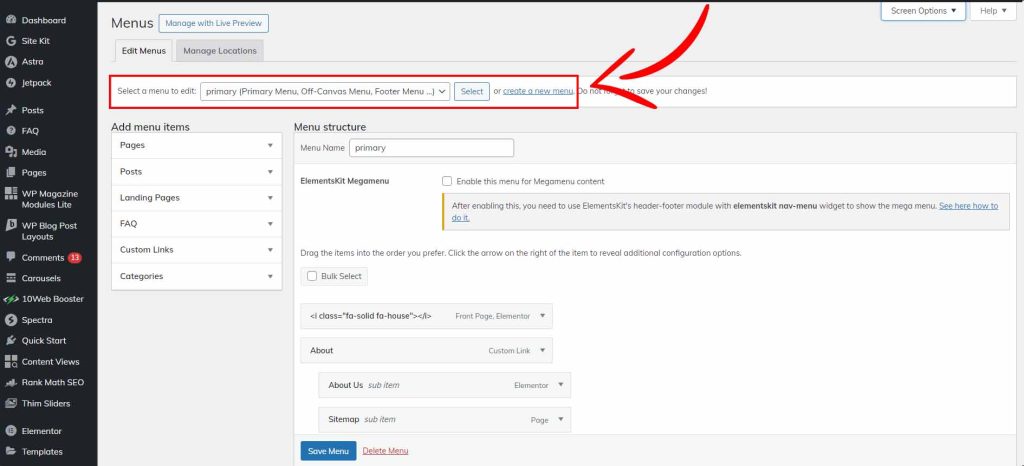
Step 3: Create a New Menu
In the “Menus” page, you’ll see a section where you can create a new menu. Give your menu a name, like “Main Menu” or “Navigation Menu,” and click the “Create Menu” button.
Step 4: Add Menu Items
Now, you can start adding menu items to your menu. On the left-hand side, you’ll see various options like “Pages,” “Posts,” “Custom Links,” and more. You can add pages or custom links to your menu by selecting them and clicking the “Add to Menu” button.

Tip: Organize Your Menu Structure
Before adding items, plan your menu structure. Think about the main menu items (parent items) and the submenus you want to create (child items). It’s essential to have a clear structure in mind to make your website navigation user-friendly.
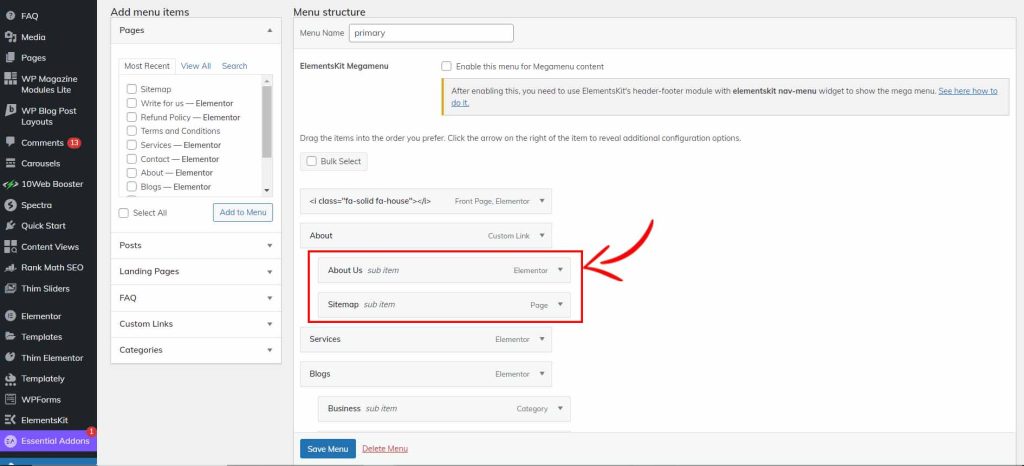
Step 5: Create Submenus
To create a submenu, simply drag a menu item below and slightly to the right of another menu item. This action will make the dragged item a submenu (child) of the item above it (parent). You can further organize submenus by dragging them slightly to the right of their parent item.
Pro Tip: Use Descriptive Labels
Ensure that your menu item labels are descriptive and make sense to your visitors. A well-named menu item helps users understand what they’ll find when they click on it.
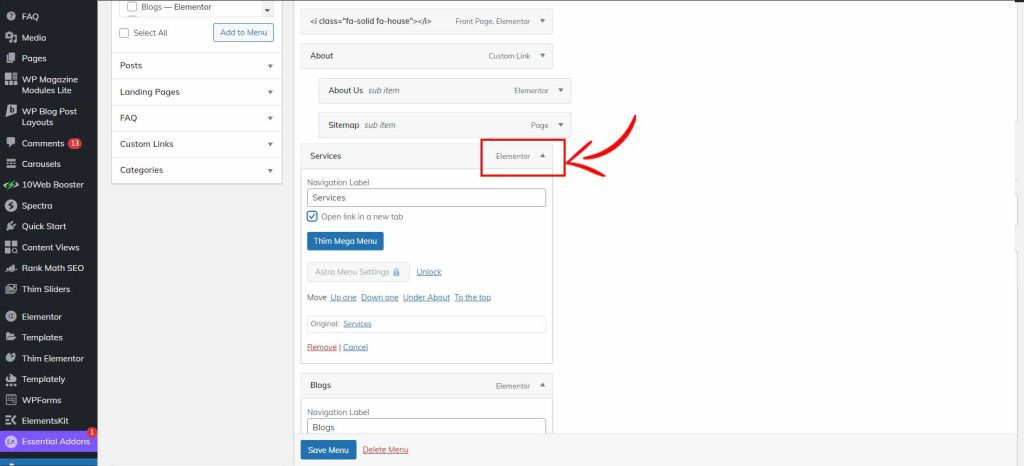
Step 6: Customize Menu Items
You can customize each menu item by clicking on the downward arrow next to it. Here, you can edit the navigation label, add title attributes for tooltips, and specify a CSS class for advanced styling.
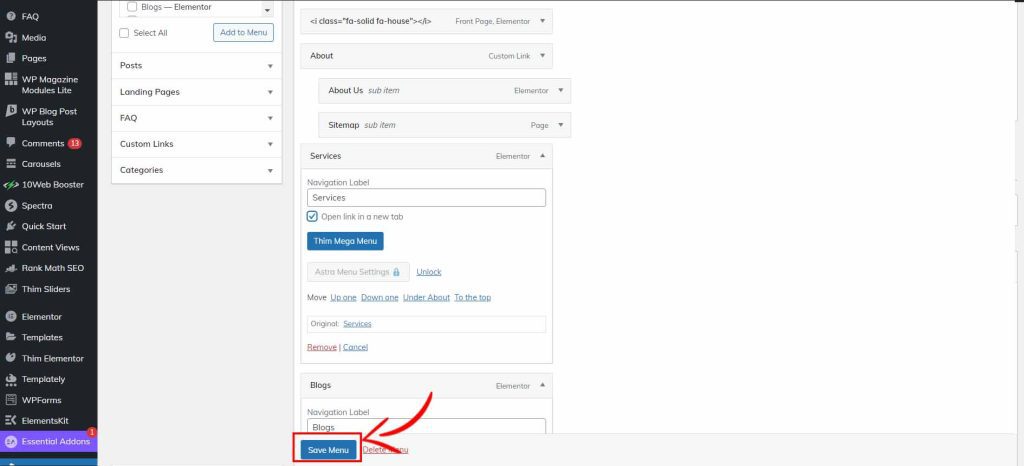
Step 7: Save Your Menu
Don’t forget to click the “Save Menu” button after making changes. This step ensures that your menu structure is saved and applied to your website.
Step 8: Assign the Menu to Your Site
To make your new menu visible on your website, you need to assign it to a location. Depending on your theme, you may have different menu locations available, such as the primary menu, footer menu, or sidebar menu.
Step 9: Test Your Submenus
After assigning the menu, visit your website to see the submenus in action. Test them to ensure that they function as expected and that the navigation is intuitive for your visitors.
Step 10: Further Customization (Optional)
If you want to take your submenus to the next level, you can explore additional customization options. WordPress offers various plugins and themes that can enhance the appearance and functionality of your submenus.
Exploring Examples of How to Create Submenus in WordPress
Now that you’ve learned the basics of creating submenus in WordPress, let’s dive into some examples of how to create submenus in WordPress to provide you with a clearer picture.
Solution 1: How to Create Submenus in WordPress – A Practical Demonstration
Let’s put what we’ve learned into action with an example. Imagine you run a food blog, and you want to create a menu that includes categories like “Appetizers,” “Main Courses,” and “Desserts.” Each of these categories will have its own submenu containing specific recipes.
- Create Main Menu Items: In your WordPress dashboard, navigate to “Appearance” > “Menus.” Create a new menu and name it “Recipe Menu.”
- Add Parent Items: Add the main menu items: “Appetizers,” “Main Courses,” and “Desserts.”
- Create Submenus: For each main menu item, drag and drop recipe pages under them. For example, under “Appetizers,” add recipes like “Spinach Dip” and “Stuffed Mushrooms” as submenu items.
- Customize Labels: Edit the labels to make them descriptive. Instead of “Spinach Dip,” use “Creamy Spinach Dip.”
- Save and Assign: Save the menu and assign it to your desired location on your website.
- Test: Visit your website to see the submenus in action. Users can now easily navigate to their favorite recipes by category.
This practical example illustrates how to create submenus in WordPress, making it clear and actionable.
Solution 2: How to Add Menu and Submenu in WordPress Plugin
If you’re looking to extend the functionality of your WordPress menu system, you can explore plugins that allow you to add menus and submenus effortlessly. One popular plugin for this purpose is Max Mega Menu, which empowers you to create complex menus and submenus with ease.
Solution 3: How to Add Submenu in WordPress Elementor
For those who use the popular Elementor page builder, adding submenus is a breeze. Elementor provides a user-friendly interface for creating and customizing menus and submenus directly within your page design. You can find detailed instructions in the Elementor documentation on creating submenus.
Solution 4: WordPress Sub-Menu Dropdown
Dropdown menus are a common and effective way to display submenus in WordPress. Themes like Astra offer built-in support for creating WordPress sub-menu dropdown items. This feature allows you to create nested menus effortlessly.
Solution 5: How to Create Multiple Menus in WordPress
In some cases, you may want to have multiple menus on your WordPress website. To achieve this, you can explore themes and plugins that offer the flexibility to create and manage multiple menus. Themes like Divi provide easy-to-follow instructions on creating multiple menus.
Solution 6: How to Add Secondary Menu in WordPress
Adding a secondary menu can be useful for highlighting specific sections of your website or offering additional navigation options. Many themes support secondary menus out of the box. You can configure and customize your secondary menu in WordPress by referring to your theme’s documentation.
When it comes to customizing your WordPress website’s navigation, understanding how to create submenus is just as important as knowing how to make a menu link open in a new tab.
Creating submenus in WordPress, as explained in this guide, builds upon the foundation of your primary menu creation, which you can learn about in our comprehensive tutorial on ‘How to Create a Menu in WordPress.‘ These submenus offer an excellent way to enhance your website’s navigation and provide users with organized access to your content.
Wrapping Up
Creating submenus in WordPress is a straightforward process that can significantly improve your website’s navigation and user experience. By organizing your content into logical hierarchies, you make it easier for visitors to find what they’re looking for.
Remember that the key to effective submenus is clarity and simplicity. Use descriptive labels, maintain a well-thought-out structure, and test your submenus from a user’s perspective. With these steps and tips, you’ll be well on your way to creating submenus that enhance your WordPress website.
For more in-depth information and advanced techniques on WordPress submenus, consider checking out the official WordPress documentation or exploring WordPress forums for additional insights.
If you’ve ever wondered about the inner workings of WordPress menus, understanding how to create submenus in WordPress can be a valuable addition to your skill set, complementing your knowledge of creating navigation menus with code.
Now that you’ve learned how to create submenus in WordPress and explored various examples, go ahead and make your website more organized and user-friendly. Your visitors will thank you for it, and you’ll have a website that stands out in the online world.
Happy submenu crafting!